No Knead Bread and the Art of Procrastibaking
PUBLISHED ON: 09.23.2023
I am not a procrastinator by nature; quite the opposite the urge to start a task or project immediately and finish it as soon as possible is my oxygen and postponement is my agony, that is until recently. I’ve become a ‘procrastibaker’
I have taken up the practice of baking something unnecessary to avoid what I should be doing. In my case, I should be preparing to sit for my wine exam. I am preparing diligently but, I have periods of time, where I cannot seem to muster the prime real estate in my head to take on another hour of climates, soils, grape growing, grape varietals, winemaker options, stainless steel, or oak fermentation-blah, blah. In my fits and starts of studying, I’ve started baking bread. Seriously? I kid you not. Suddenly measuring flour, yeast, and salt to make bread is my new low stake artistic outlet.
I am weeks out from sitting for a major wine exam and I am learning how to bake bread. I even bought a new book “Baking Bread for Beginners” by Bonnie Ohara (what did we do before Amazon?), and I have new digital scale, thermometer and banneton basket. Who needs the Imperial system of ounces and cups, I am measuring in grams now too! SAVE ME!
I must admit there is a Zen and a rhythm to making bread, and it calms the storm in my head. If you need a reason to create space to accomplish the ‘must do’s’ in your life, I recommend you bake some bread.
The recipe below is the simplest way to get a fresh loaf of bread onto your table.
No-Knead Bread
Bead Baking for Beginners-Recipe by Bonnie Ohara
Makes 1 loaf
Tools Needed: Thermometer, kitchen scale, large bowl, round basket, kitchen towel, Dutch Oven.
Ingredients:
8 grams instant yeast
375 grams water
500 grams all-purpose flour
10 grams of salt
PREPARE:
Find the ambient temperature of your kitchen with a thermometer. A great way to do this is to take the temperature of your flour while it is sitting out at room temperature. The formula is:
Take 225-(Flour Temperature + Air temperature+5) = This will give the correct water temperature needed.
Tip: The easiest way to get my water to the correct temperature is to fill a pitcher or jar with hot water and one with cold water from the tap. I pour the cold water into the hot water until I’ve reached the ideal temperature.
The ideal temperature of your dough is 76 degrees.
SCALE:
Weigh all the ingredients separately before you begin. This helps keep everything accurate. Use smaller bowls for ingredients in smaller amounts, like yeast and salt, to get the most precise reading.
COMBINE:
In a large bowl, disperse the yeast into the water with a gentle swish of your fingers, like making a bubble bath. Let it sit for a couple of minutes. You should see a light foaming from the yeast, letting you know it’s lively, and ready to go to work for you. Next, add the flour on top of the water and yeast. Last sprinkle the salt on top of the flour. This keeps the salt from coming into contact with the yeast, which can inhibit the rise.
MIX:
I like to use my hands. If you have an aversion to getting a bit sticky, a nice sturdy wooden spoon can do the trick on this wetter dough. I think hand mixing is really helpful for feeling the ingredients are well combined. The ingredients should come together easily and produce a slack, wet dough.
REST:
Let your dough relax for about 20 minutes so the flour can absorb the water a bit.
FOLD:
Stretch and fold the dough, which will give it strength so it can hold its shape in the oven later. Imagine that your dough has four “corners.” Pull each corner up and stretch it over the top of the dough to meet the opposite side Visualizing a clock on the top of your bowl of dough, pull the 12 o’clock corner up and down to 6. Pull the 3 o’clock over to 9, then the 6 o’clock up to 12, and the 9 o’clock over to 3. Work your way around the clock two or three times, until the dough becomes a tight ball and is no longer loose and stretchy. You have just achieved some gluten development!
RISE:
Place a floured kitchen towel (or plastic wrap if that’s what you have) over your bowl and go enjoy your life for 1 hour 30 minutes.
CHECK:
At 1 hour 30 minutes, the dough should be noticeably lighter, larger, and filled with air bubbles. To double-check, fill a cup with water, pinch off a little ball of your dough, and drop it into the glass. It should float to the top, indicating that your dough is aerated. Nice! If it doesn’t seem particularly buoyant, it might be a cold day at your house. No worries. Let it rise a bit longer and check it again in 30 minutes or so.
SHAPE:
Gently turn your dough onto a floured countertop. The bottom, which was in contact with the bowl, will be facing up to you. If it is sticking to the bowl, use your hand or a plastic scraper to release it. Shape this dough easily by giving it a gentle letter fold: Fold the far side (12 o’clock) down to the middle, sealing the dough against itself. Now fold the bottom up to meet the seam and seal it. Turn the dough so this seam is vertical, and do that letter fold again, sealing the dough to itself. You should have a nice little rounded square shape. If the dough is nice and tight, you can stop there. If it seems very relaxed, you can give it another set of letter folds to create more tension, sealing the dough to itself.
PROOF:
Place your dough round into a basket lined with a floured kitchen towel, seam-side down. You are going to let this dough rise for 1 hour to 1 hour 30 minutes, until the dough feels airy, like a marshmallow. When pressed with a finger, it should leave an indent instead of springing This is the final rise before it hops into the oven.
PREHEAT:
While the dough is proofing, turn on your oven with an empty Dutch oven inside and let it preheat to 475°F. This may seem early to preheat the oven, but great bread needs a thoroughly hot oven for the best results.
CHECK:
To test that the dough is well proofed, press a finger gently into the dough. If it seems springy and tight, it needs more time. If it feels airy and light (like a marshmallow), it’s ready to bake. Needing more time for proofing is a common theme in baking bread. Don’t worry if your dough needs more time to rise! Feeling the dough and adapting to the timing needs every time you bake bread is the way to become a better baker, so let your senses guide you.
BAKE:
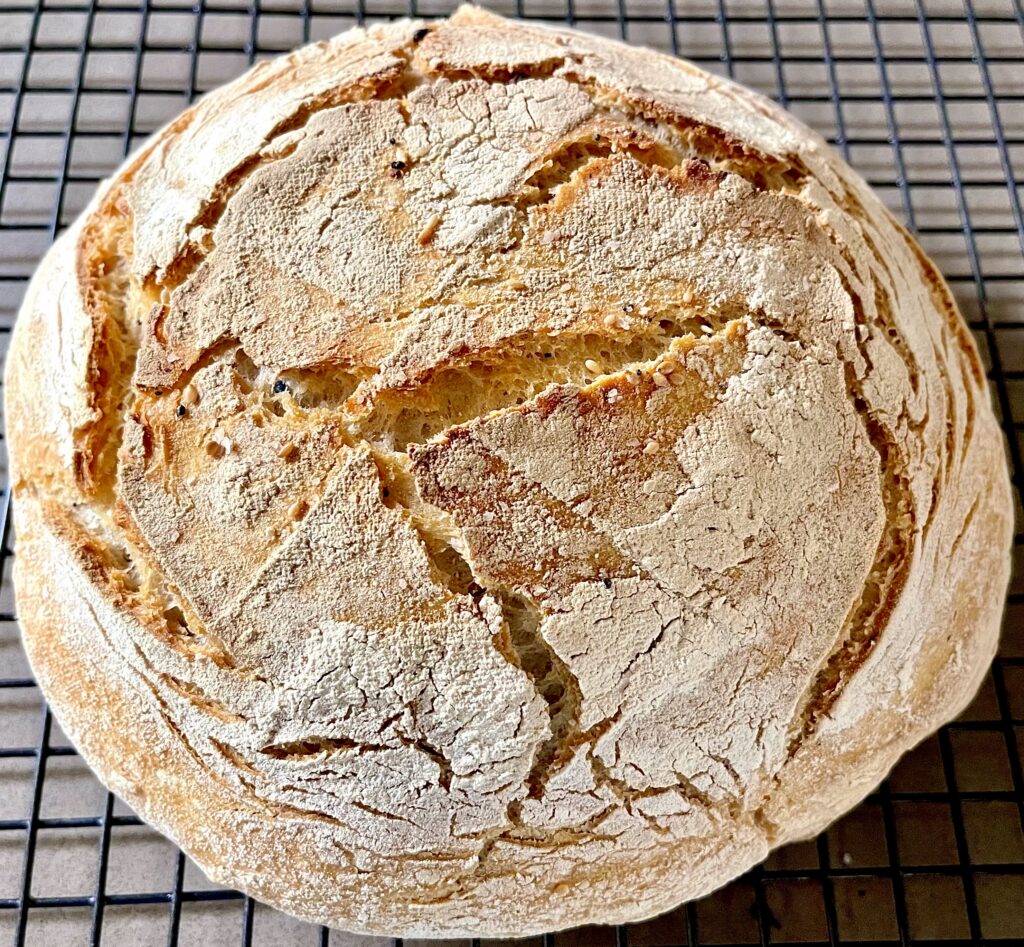
Flour your work surface well and tip the loaf out of your basket onto it, seam-side up. Carefully pull out your very hot Dutch oven out of the oven and place it on top of the stove with the lid next to it. Pick the dough up with your hands and gently drop it into the Dutch oven, seam side up (it will open at that seam, resulting in a classic rustic loaf). Cover the Dutch oven with the lid, slide it into the oven, and bake for 25 minutes.
CHECK:
At 25 minutes, take the cover off the Dutch oven. You should see a pale blond loaf that has risen to meet you. Continue baking with the cover removed for another 15 to 20 minutes. Your loaf will get some color and develop a nice crust. The finished loaf should be golden brown and will sound hollow when you thump it with your fingers. If the loaf seems to be browning too quickly, turn your oven down to 450°F.
COOL:
Let your finished loaf cool on a wire rack for 30 minutes to let the interior crumb set, making it easier to slice. You’ve just made your first loaf of bread!
Jena Grignon
Love this!
sherry
I do love a no-knead bread. Just whacking it into the fridge overnight to prove is a thing of beauty!
Eva Taylor
I love weighing my ingredients, so simple and I’m not dirtying a million cups and spoons! Plus, it’s so accurate! I have a tiny little scale for very small measures (I once saw drug dealers use the same scale on a reality show about the cartel in Spain!)
I have a no knead bread recipe on my blog that literally has no kneading or folding, but it takes time, overnight to be precise so I’m curious about your recipe, will try it soon.
I wish you well on your wine exam, I haven’t challenged myself academically in years, I can certainly understand the desire to put it off.
Chef Mimi
What a great word! And I can’t believe what you’re doing, although you’re much younger than I am, and my brain functioned better then. You are definitely passionate about food and wine! I wish we could get together. I’ve never followed a recipe for bread, except when I was a kid. Baking bread doesn’t have to be scientific. But then, if that’s the part you enjoy, then so be it! A beautiful loaf.
Larry
If you like to bake, this is as good a reason as any – the bread looks very good.
David Scott Allen
No-knead bread has been one of the greatest things to come to the surface. I say “come to the surface” because I somehow think these breads have been made for ages but someone in the early 2000s called it no-knead bread and, voilà, it’s a modern day miracle. 🙂 But it is, really! And the amount of important detail you give is making me rethink how I make it! Thanks, Velva!
Shirley
Looks like a lot of fun. Last time I tried to make bread it was awful I should have sent it to the army for the prototype for a secret weapon! You have given me inspiration.
Shirley L McFadden
Looks like a lot of fun. Last time I tried to make bread it was awful I should have sent it to the army for the prototype for a secret weapon! You have given me inspiration.
Lea Ann (Cooking On The Ranch)
I haven’t made it recently, but am in love with those no-knead breads. When I attended Culinary School, the first three weeks was an intensive crash course on wine. My goodness, so much to learn. I really feel we should have gotten a level one sommelier certificate, but we didn’t. Have fun with that course.
Liz
What a gorgeous loaf!!! I’d love a slice with cool, creamy butter!! Make that 2 or 3—I love, love carbs!!!
Tandy | Lavevender and Lime
I love procrastibaking! And this method of stretching and folding is the one I prefer. Good luck with your exams 🙂
David @ Spiced
Oh that bread looks fantastic! I absolutely understand where you’re coming from here. The art of making bread is so easy to learn, and there are so many different variations that it gives you the chance to learn and practice for years to come. I think you’ve found a great partner to that wine course as we all know a good glass of wine and a chunk of crusty homemade bread go well together! 🙂
Judee
Well your. bread looks wonderful and I can think of worse avoidance issues. You made me think that maybe I do the avoidance with my blog. I find it very soothing to correspond with other bloggers, think up posts etc. while there are things I should be taking care of…I get it.. Good luck with your exam. It sounds intense.
Alfreda James
Hmmmmm, I’ve never been interested in bread making but maybe this recipe will push me to do it.
Roz | La Bella Vita Cucina
I love how you describe procrastibaking! And what a delicious way to procrastinate, Velva! I keep telling myself that I am going to bake bread, but I can never find the time. So I bought a bread machine instead. Nothing like warm bread with creamy butter spread on top! Knock ’em dead on that wine exam! I’m cheering for you!
x0 Roz
Jeff the Chef
I love the term “procrastibaking!”
2pots2cook
It seems you have great anti stress therapy while making bread…… good for you!
Balvinder
I haven’t baked any bread lately but I do love no knead breads. In fact glutenfree breads are normally no knead.
Colette
This loaf looks gorgeous.
I hate kneading. I’ve gotta try this recipe. Thanks! xo
Michaela
This loaf is stunning, and I highly appreciate the recipe and the tips. I can’t wait to make this using my beloved Bob’s Red Mill flour. Saddened to hear of Mr. Moore’s recent passing. I think their flours are fantastic!
Thank you so much for sharing. Happy to connect 🙂